Pages

Monday 26 November 2012

Happy Muslin of Burda 7273


A while ago, I visited Exeter (UK) when DD had a dance audition to be in the musical Cats (Andrew Lloyd Webber music with  T S Eliot’s cat poems.)

Whilst Beth danced, I found this great little fabric shop http://www.memefabricshop.co.uk/shop/  Meme.  It had only a limited range of fabrics, but sometimes that makes the fabric that is there, stand out.  The owner was great, helpful and knowledgeable.

This is what I bought:

IMG_1277

A soft knitted wool fabric, expensive but light as a whisper – it washed beautifully too.

Wary of cutting into such wonderful cloth, I bought some fleece to make a muslin of Burda 7273

Photophotostream

I think I count this as a wearable muslin, it is really comfy and has only a few niggles.

I made the version with the collar, reducing the size of the collar, and making a jacket length (I only bought 2m of my wool fabric.)  I also added a button and loop so I can close it.


IMG_1207IMG_1206

cut down collar                                                   reduced hem

I also put darts in the back to make it more fitted, I don’t think the dart position is quite right can anyone advise?

photostreamIMG_1269photostream

The collar does sit flat, just that Graham didn’t spot the wrinkle when he photographed.  I count this as a wearable muslin, so am not worried about the sleeve insertion wrinkles – I can sort them.

Tuesday 20 November 2012

Olive Moleskin Waistcoat/vest with Funky Lining


Burda 7854  Burda’s description: A hip-length vest/waistcoat with figure-accenting section seams is the perfect partner for pants/trousers and pullover. Make it from quilted fabric for a sporty look or use faux fur for dramatic impact. Both will warm you on cooler days.

IMG_1184IMG_1198

PhotoLine Drawing

I downloaded this ages ago from http://sewingpatterns.com/  Living in the UK, sometimes it is easier to download patterns than buy them, I use sewingpatterns.com frequently.

I have recently lost weight and was not sure which size to use, I intended to trace a 14 but did a 12 by mistake. I just about got away with it, I have another 8lb to lose so it should be just right by then.

I traced the pattern and cut out my muslin when I was at a sewing get together in Kent.  My dear friend Sigrid helped with the fit, and what a superb job she made.

I changed the design a bit, I made it quite a bit shorter.  I also made it from cotton moleskin instead of fur fabric, I think this was a bad move because a number of the design features where for a particular fabric.

The instructions were not bad, this was the first lined garment I have made for many a year and I suspect there may be easier ways than the method I followed from the Burda instructions.

Fabric Used:  Outer fabric is olive cotton moleskin bought in Paris on my first ever PR meet up. Lining is a brocade with dragon flies bought from http://www.mrosenbergandson.com/index.htm, their website seems to be under maintenance at the moment but I'm sure their great fabrics will return.

Pattern alterations or any design changes:

I love the armhole princess and also the collar which keeps my neck warm. I added a wedge shape to the collar centre back so it stood away from my neck (I have had surgery on my neck and it doesn't like pressure.)

The main change is to shorten the  pattern, in the event, I seem to have shortened it a bit too much. I will add an inch or so next time.

I used a moleskin instead of a fur or quilted fabric. I hate to think how difficult it would be to sew the collar with fur.

I think I should have made the version with the rounded front, it would have been much easier to understitch too.

I added two inside pockets - one for my phone and one for a hanky IMG_1197photostream

I will make this again, a bit longer next time. I forgot to do the under collar on the bias, I also didn't allow for turn of cloth, I'm sure I will do a better job next time.

Because it is designed for fur fabric, the centre front is lined rather than faced. I used a contrast lining and in hindsight this was not a great idea because it shows at the centre front.

I used a black frog fastener I found in my stash – no idea where it came from (will photograph in the daylight tomorrow)

I definitely recommend this pattern, it is easy to fit and looks stylish.

Please excuse the badly fitting trousers, I am experimenting with taking them in – this attempt is not my best.


This project seemed to go on forever, I am already onto my next, a wearable muslin for Burda 7275

Photo

Sunday 28 October 2012

Tizzy needs a trim


I have been putting off trimming Tizzy, my Miniature Schnauzer, for way too long.  She has been looking very shaggy for a while now.

 IMG_1164IMG_1166

First I had to trim my husband Graham’s hair, then I moved on to the more challenging task of Tizzy.  Here she is on the trimming table (actually a camping cupboard but is a great height)

IMG_1167

By the look of the fluff on the table, I have done a lot – doesn’t show yet.  I start with the chest up to her face, then the ears.

Because it is winter time, I cut her body hair with a longer blade on the clippers – about 1cm rather than a half.  She gets the shivers  if I cut it too short.  I trim her leg fur shorter in the winter because otherwise she spends too much time in the sink having mud washed off after forest walks.

An hour and a half later, we are nearly there.  Undercarriage trimmed, legs trimmed, tail all neat and tidy.

IMG_1168IMG_1169

She didn’t want to stand for a photo, so here she is on the doormat.  I will probably give her a neaten up tomorrow.

IMG_1171

Thursday 4 October 2012

Fabric Bowl second instalment


Before you start Free Motion Embroidery with your sewing machine, draw your designs with pen or pencil on paper.  This gets you used to the flow of the design – especially the spiral where you have to leave yourself room to go into the middle and back again.

IMG_1098

then it is time to start.  Lower or cover your feed dogs.  ( If you are using a slippery sheet, tape your Teflon sheet over the work area to make it nice and slippery)

Drop and raise your needle to pull up the bobbin thread.  Do a few stitches on the spot to secure the ends, spread your hands over the work and move it so that the stitches form your chosen design.  I use the Pfaff Free-Motion guide grip http://www.pfaff.com/AU/3483_14637.html, this makes it easy to move the fabric.

IMG_1060IMG_1061

IMG_1064IMG_1066

Divide the circle design into six sectors and free motion each in a slightly different design.  Once you have embroidered all the sectors cut the fabric you have produced into a circle.

Satin stitch the edge.  Set your stitch to about 0.4 length, 4.5 width, If your bobbin case has a finger with a hole in it, thread the bobbin thread through the hole to put more tension on the bobbin.

IMG_1071IMG_1079

To strengthen the edge, widen the zigzag to 5.5mm the stitch some cord or rattail onto the edge.

Once this is done, decide which way up you want your fabric.  I was originally going to have the blue side inside but changed my mind once I had tried it with pins.


IMG_1081IMG_1082


IMG_1092IMG_1093

I forgot to photograph the stitching of the six edges, basically starting about 1cm in from the folded edge, sew photostreamtowards the centre forming a sort of dart shape.  I took 2 attempts until I liked the shape of the overall bowl.  I used a triple back and forth stitch for strength.

IMG_1097IMG_1096

Wednesday 3 October 2012

Fabric Bowl - first edition


I am meeting up with some sewing friends next week and have decided to create a project that can be used to try FME  Free Motion Embroidery.  I will detail the project below.


IMG_1096IMG_1097

1) Choose a fabric for the inside of the bowl – you will need about 25cm squareIMG_1045IMG_1047

2) Place this face down, place a square of felt on top (pink in the picture, the paper shows the size needed for the finished bowl)

3) I spray this with a thin coating of spray adhesive

4) Place little bits of offcut fabric pieces – any sort including bits of ribbon on top

IMG_1048IMG_1050

5) To hold all this in place cover with organza or tulle then pin in place with about 6 pins

IMG_1052

Some of you may have heard of a Supreme Slider to allow easy free motion quilting, this is a slippery sheet which has a hole in it for the needle to sew through, it covers the bed of the machine and makes a smooth and slippery bed for the fabric to slide on.

These are expensive, I have another solution.  In my cupboard, I had a Teflon sheet intended to line the base of the oven or grill, this is to catch drips etc.  I cut a hole big enough for zigzag stitching, then taped the sheet over the machine and the sewing table.

IMG_1069IMG_1056IMG_1057IMG_1059

More tomorrow…

Sunday 23 September 2012

McCall’s 6208 in Grey Jersey from Amsterdam

photostreamphotostreamIMG_0988

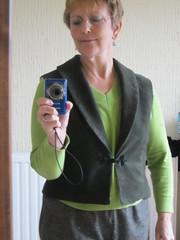
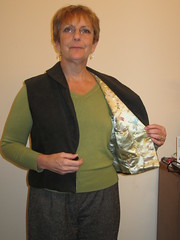
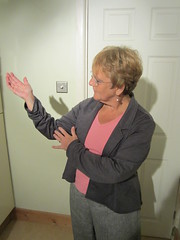
I was having problems with the exposure on the camera, this photo shows the front view well but makes me look rather orange.

IMG_0980

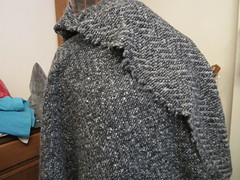
As mentioned a while ago, I started to make a jacket from Grey Jersey I bought in Amsterdam when a group of fellow sewists from around Europe met up.
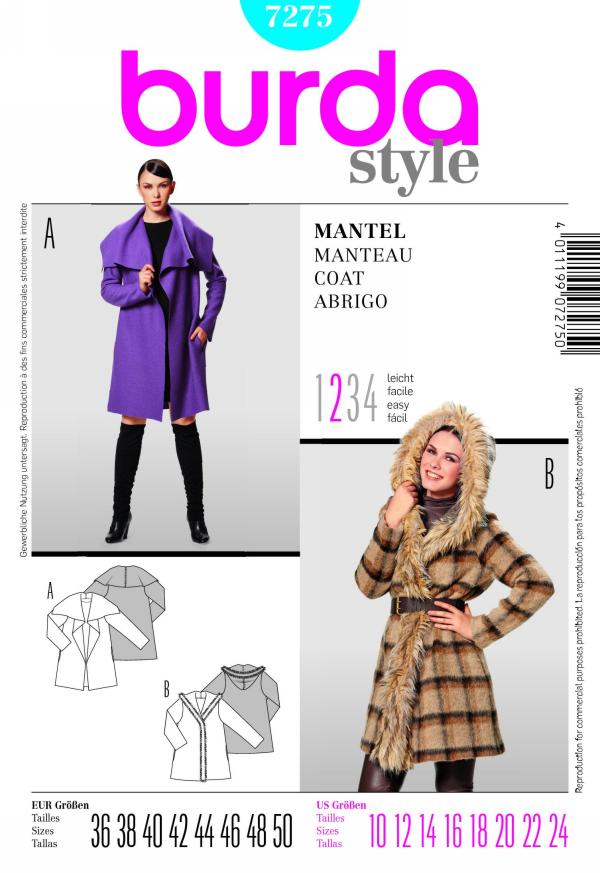
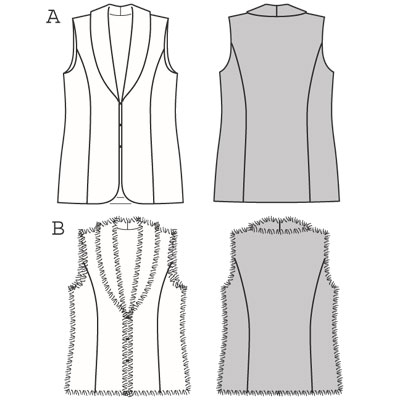
The pattern is M6208Mcalls 6208

Loose fitting, below hip length cardigans A, B, C, D, E; cardigans A, B, C have notched collar and shaped hem; cardigans A, D are sleeveless; cardigans B, C, E have long sleeves; cardigan B has elasticized sleeve seam at lower edge; cardigans A, B have back belt; cardigan C has belt; cardigans D, E have lapel and drop shoulders; cardigan D has patch pockets.

I made view B. I made a medium size because it matched up with the measurements of a favourite cardigan. I love the fact that the jacket is made from a comfortable jersey yet it has smart  lapels like a jacket.

This pattern was well drafted, all the notches lined up, and the sleeves went smoothly into the armhole with no wrinkles.

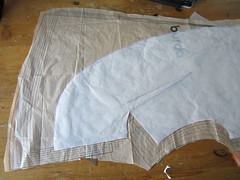
I made a few alterations to fit my body.

I lowered the back neck and curved the back centre seam in at the top, to accommodate my rounded upper back.

I also narrowed the chest at the armhole fronts and enlarged the sleeves to allow for my muscular arms (many months spent using crutches due to feet breaking mean that my biceps are well formed.)  I was really pleased that the sleeves fitted in smoothly to the armholes.

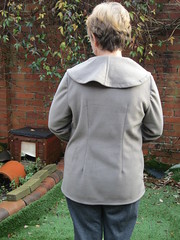
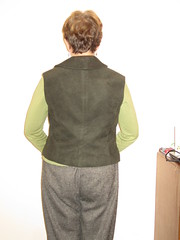
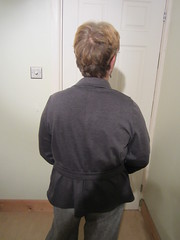
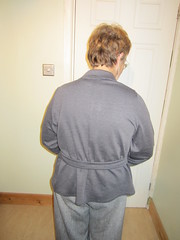
I shortened the overall garment by at least 4 inches (I am 5’ 2.5”) and made a design change to the back.

There is a half belt at the back, I shortened this to fit my waist thus forming a peplum look to the back of the jacket.  I feel this gives it a current look.  This shortening meant that the jacket body was pulled in to fit the belt, this did tend to cause lumps and bumps rather than a smooth gathered look.  My solution was to run a gathering stitch along the waistline and after adjusting the gathers, I sewed it again to hold the gathers in place.


IMG_0987

I like the way the lapels and collar facing were formed, 2 separate pieces were created and sewn together – I haven’t sewn many collars and this was the most successful to far.

I like to have pockets in my jackets so I can carry my phone and a tissue.  I originally intended to make side seam pockets but when I pulled the back belt shorter, the pockets gaped.  My solution was to make a hanging pocket from the left armhole.

This isn’t ideal because it does pull a bit on the jacket front, but it is better than not having anything.IMG_0983

I did have a problem in the inside where the front facing met the front, there seemed to be too many bits of fabric at odd angles to lay flat and behave.


IMG_0972

I did manage to do the top stitching with the help of my Humper Jumper, but it is not the most beautiful on the inside.

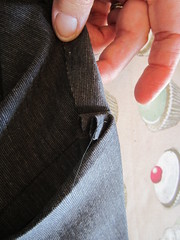
The sleeves are really cute, such an easy trick.  After stitching the underarm seam of the longer than usual sleeve, an extra seam 1/4” away within the seam allowance is sewn from the wrist up for about 15cm.  Within this, a piece of elastic (11cm) is threaded and the ends secured – result, a cute gathered detail.

IMG_0984

I think I will search my stash for some more heavyweight jersey.  This is so comfy to wear, I must have another one.